设计模式
6大原则
wiki链接:SOLID (面向对象设计)
| 首字母 | 指代 | 概念 |
|---|---|---|
| S | 单一功能原则 | 认为对象应该仅具有一种单一功能的概念。 |
| O | 开闭原则 | 认为“软件体应该是对于扩展开放的,但是对于修改封闭的”的概念。 |
| L | 里氏替换原则 | 认为“程序中的对象应该是可以在不改变程序正确性的前提下被它的子类所替换的”的概念。参考契约式设计。 |
| I | 接口隔离原则 | 认为“多个特定客户端接口要好于一个宽泛用途的接口”的概念。 |
| D | 依赖反转原则 | 认为一个方法应该遵从“依赖于抽象而不是一个实例”的概念。依赖注入是该原则的一种实现方式。 |
单一职责原则
Single Responsibility Principle,简称SRP,可以降低修改带来的风险。
对类、接口、方法进行拆分,保证一个模块只有一个改变的原因
例如实体类与其业务类的拆分。
开闭原则
Open Closed Principle
软件中的对象(类,模块,函数等等)应该对于扩展是开放的,但是对于修改是封闭的。
改变源代码需要代码审查,单元测试以及诸如此类的用以确保产品使用质量的过程。 遵循这种原则的代码在扩展时并不发生改变,因此无需上述的过程。
里氏替换原则
Liskov Substitution Principle,简称LSP,可以防止继承后修改带来的风险。
派生类(子类)对象可以在程式中代替其基类(超类)对象
为了满足该原则,需要满足以下约束:
- 子类不得重写父类的非抽象方法。
- 子类实现父类的抽象方法时,方法的前置条件(即方法的形参)要比父类方法的输入参数更宽松。
- 子类实现父类的抽象方法时,方法的后置条件(即方法的返回值)要比父类更严格。
满足以上约束后,在父类出现的地方使用子类代替父类,就不会出现异常。
接口隔离原则
Interface Segregation Principles, 简称ISP,可以解耦,容易重构与修改。
客户(client)应该不依赖于它不使用的方法。
使用多个隔离的接口,比使用单个接口好,建立最小的接口
依赖倒置原则
Dependence Inversion Principle,简称DIP,可以解耦,容易重构与修改。 该原则规定:
高层次的模块不应该依赖于低层次的模块,两者都应该依赖于抽象接口。抽象接口不应该依赖于具体实现。而具体实现则应该依赖于抽象接口
迪米特法则
Law of Demeter,简称LoD,可以解耦,增加复用性。
一个对象应该对其他对象有最少的了解。
23种设计模式
wiki链接: 设计模式
创建型模式
抽象工厂模式
为一个产品族提供了统一的创建接口。当需要这个产品族的某一系列的时候,可以从抽象工厂中选出相应的系列创建一个具体的工厂类。
// 例:客户可以根据需要选择 Mac 风格或者 Win 风格的 Button 或 Border
// 接口
public interface Button {}
public interface Border {}
// 实现抽象类
public class MacButton implements Button {}
public class MacBorder implements Border {}

public class WinButton implements Button {}
public class WinBorder implements Border {}
// 实现工厂
public class MacFactory {
	public static Button createButton() {
	    return new MacButton();
	}
		public static Border createBorder() {
	    return new MacBorder();
	}
}
public class WinFactory {
	public static Button createButton() {
	    return new WinButton();
	}
		public static Border createBorder() {
	    return new WinBorder();
	}
}
工厂方法模式
定义一个接口用于创建对象,但是让子类决定初始化哪个类。工厂方法把一个类的初始化下放到子类。
// 例:客户选择 Mac 风格或者 Win 风格的 Button
// Button类
class Button{/* ...*/}
class WinButton extends Button{/* ...*/}
class MacButton extends Button{/* ...*/}

// 工厂类
interface ButtonFactory{
    Button createButton();
}
class WinButtonFactory implements ButtonFactory{
    Button createButton(){
        return new WinButton();
    }
}
class MacButtonFactory implements ButtonFactory{
    Button createButton(){
        return new MacButton();
    }
}
建造者模式
将一个复杂对象的构建与它的表示分离,使得同样的构建过程可以创建不同的表示。
/** "Product" */
class Pizza {
    private String dough = "";
    private String sauce = "";
    private String topping = "";

    public void setDough (String dough)     { this.dough = dough; }
    public void setSauce (String sauce)     { this.sauce = sauce; }
    public void setTopping (String topping) { this.topping = topping; }
}


/** "Abstract Builder" */
abstract class PizzaBuilder {
    protected Pizza pizza;

    public Pizza getPizza() { return pizza; }
    public void createNewPizzaProduct() { pizza = new Pizza(); }

    public abstract void buildDough();
    public abstract void buildSauce();
    public abstract void buildTopping();
}

/** "ConcreteBuilder" */
class HawaiianPizzaBuilder extends PizzaBuilder {
    public void buildDough()   { pizza.setDough("cross"); }
    public void buildSauce()   { pizza.setSauce("mild"); }
    public void buildTopping() { pizza.setTopping("ham+pineapple"); }
}

/** "ConcreteBuilder" */
class SpicyPizzaBuilder extends PizzaBuilder {
    public void buildDough()   { pizza.setDough("pan baked"); }
    public void buildSauce()   { pizza.setSauce("hot"); }
    public void buildTopping() { pizza.setTopping("pepperoni+salami"); }
}


/** "Director" */
class Waiter {
    private PizzaBuilder pizzaBuilder;

    public void setPizzaBuilder (PizzaBuilder pb) { pizzaBuilder = pb; }
    public Pizza getPizza() { return pizzaBuilder.getPizza(); }

    public void constructPizza() {
     pizzaBuilder.createNewPizzaProduct();
     pizzaBuilder.buildDough();
     pizzaBuilder.buildSauce();
     pizzaBuilder.buildTopping();
    }
}

/** A customer ordering a pizza. */
class BuilderExample {
    public static void main(String[] args) {
     Waiter waiter = new Waiter();
     PizzaBuilder hawaiian_pizzabuilder = new HawaiianPizzaBuilder();
     PizzaBuilder spicy_pizzabuilder = new SpicyPizzaBuilder();

     waiter.setPizzaBuilder ( hawaiian_pizzabuilder );
     waiter.constructPizza();

     Pizza pizza = waiter.getPizza();
    }
}
单例模式
确保一个类只有一个实例,并提供对该实例的全局访问。
// 例:懒汉模式:(此种方法只能用在JDK5及以后版本(注意 INSTANCE 被声明为 volatile))
public class Singleton {
    private static volatile Singleton INSTANCE = null;

    // Private constructor suppresses
    // default public constructor
    private Singleton() {};

    //Thread safe and performance  promote
    public static  Singleton getInstance() {
        if(INSTANCE == null){
             synchronized(Singleton.class){
                 // When more than two threads run into the first null check same time,
                 // to avoid instanced more than one time, it needs to be checked again.
                 if(INSTANCE == null){
                     INSTANCE = new Singleton();
                  }
              }
        }
        return INSTANCE;
    }
}

// 饿汉模式:
public class Singleton {
    private static final Singleton INSTANCE = new Singleton();

    // Private constructor suppresses
    // default public constructor
    private Singleton() {};

    public static Singleton getInstance() {
        return INSTANCE;
    }
}
原型模式
用原型实例指定创建对象的种类,并且通过拷贝这些原型,创建新的对象。
适用于复制一个创建复杂的或者耗时的实例。
/** Prototype Class **/
public class Cookie implements Cloneable {
    public Object clone() throws CloneNotSupportedException{
        //In an actual implementation of this pattern you would now attach references to
        //the expensive to produce parts from the copies that are held inside the prototype.
        return (Cookie) super.clone();
    }
}

/** Concrete Prototypes to clone **/
public class CoconutCookie extends Cookie { }

/** Client Class**/
public class CookieMachine{
    private Cookie cookie;//cookie必须是可复制的

    public CookieMachine(Cookie cookie) {
        this.cookie = cookie;
    }

    public Cookie makeCookie(){
        try{
            return (Cookie) cookie.clone();
        } catch (CloneNotSupportedException e){
            e.printStackTrace();
        }
        return null;
    }

    public static void main(String args[]){
        Cookie tempCookie =  null;
        Cookie prot = new CoconutCookie();
        CookieMachine cm = new CookieMachine(prot); //设置原型
        for(int i=0; i<100; i++){
            tempCookie = cm.makeCookie();//通过复制原型返回多个cookie
        }
    }
}
结构型模式
适配器模式
将某个类的接口转换成客户端期望的另一个接口表示。适配器模式可以消除由于接口不匹配所造成的类兼容性问题。
适配器模式属于补偿模式,专用来在系统后期扩展、修改时使用。 但是过多的使用适配器,会让系统非常零乱,不易整体进行把握。 如果不是很有必要,可以不使用适配器,而是直接对系统进行重构。
参考链接:IBM-开发社区-适配器模式
桥接模式
将一个抽象与实现解耦,以便两者可以独立的变化。
它把事物对象和其具体行为、具体特征分离开来,使它们可以各自独立的变化。 事物对象仅是一个抽象的概念。如“圆形”、“三角形”归于抽象的“形状”之下,而“画圆”、 “画三角”归于实现行为的“画图”类之下,然后由“形状”调用“画图”。
使用桥接模式可以使结构清晰,易于扩展。
// 例:写出两个不同的圆的坐标和半径。
//     API1.circle at 1:2 7.5
//     API2.circle at 5:7 27.5

/** "Implementor" */
interface DrawingAPI
{
    void drawCircle(double x, double y, double radius);
}

/** "ConcreteImplementor" 1/2 */
class DrawingAPI1 implements DrawingAPI
{
   public void drawCircle(double x, double y, double radius)
   {
        System.out.printf("API1.circle at %f:%f radius %f\n", x, y, radius);
   }
}

/** "ConcreteImplementor" 2/2 */
class DrawingAPI2 implements DrawingAPI
{
   public void drawCircle(double x, double y, double radius)
   {
        System.out.printf("API2.circle at %f:%f radius %f\n", x, y, radius);
   }
}

/** "Abstraction" */
interface Shape
{
   void draw();                             // low-level
   void resizeByPercentage(double pct);     // high-level
}

/** "Refined Abstraction" */
class CircleShape implements Shape
{
   private double x, y, radius;
   // "形状"与"画图"之间建立桥梁,形状调用画图
   private DrawingAPI drawingAPI;
   public CircleShape(double x, double y, double radius, DrawingAPI drawingAPI)
   {
       this.x = x;  this.y = y;  this.radius = radius;
       this.drawingAPI = drawingAPI;
   }

   // low-level i.e. Implementation specific
   public void draw()
   {
        drawingAPI.drawCircle(x, y, radius);
   }
   // high-level i.e. Abstraction specific
   public void resizeByPercentage(double pct)
   {
        radius *= pct;
   }
}

/** "Client" */
class BridgePattern {
   public static void main(String[] args)
   {
       Shape[] shapes = new Shape[2];
       shapes[0] = new CircleShape(1, 2, 3, new DrawingAPI1());
       shapes[1] = new CircleShape(5, 7, 11, new DrawingAPI2());

       for (Shape shape : shapes)
       {
           shape.resizeByPercentage(2.5);
           shape.draw();
       }
   }
}
组合模式
把多个对象组成树状结构来表示局部与整体,这样用户可以一样的对待单个对象和对象的组合。
如文件如文件夹都看作一个条目,就形成目录结构。
// 创建文件处理异常类
public class FileTreatmentException extends RuntimeException {
    public FileTreatmentException() {}
    public FileTreatmentException(String message) { super(message);}
}
// 创建文件与文件夹的抽象类"条目"
public abstract class Entry {
    protected Entry parent;
    public abstract String getName();
    public abstract int getSize();
    protected abstract void printList(String prefix);
    public Entry add(Entry entry) throws FileTreatmentException{
        throw new FileTreatmentException();
    }
    public void printList(){
        printList("");
    }
    @Override
    public String toString() {
        return getName() + " (" + getSize() + ")";
    }
    public String getFullPath(){
        StringBuffer fullPath = new StringBuffer();
        Entry entry = this;
        do {
            fullPath.insert(0, "/" + entry.getName());
            entry = entry.parent;
        } while (entry != null);
        return fullPath.toString();
    }
}
// 定义文件类
public class File extends Entry {
    private String name;
    private int size;
    public File(String name, int size) {
        this.name = name;
        this.size = size;
    }
    public String getName() { return this.name; }
    public int getSize() { return this.size; }
    protected void printList(String prefix) {
        System.out.println(prefix + "/" + this);
    }
}
// 创建文件夹
public class Directory extends Entry {
    private String name;
    private List directory = new ArrayList();
    public Directory(String name) { this.name = name; }
    public String getName() { return this.name; }
    public int getSize() {
        int size = 0;
        Iterator iterator = directory.iterator();
        while (iterator.hasNext()) {
            Entry entry = (Entry) iterator.next();
            size += entry.getSize();
        }
        return size;
    }
    @Override
    public Entry add(Entry entry) {
        directory.add(entry);
        entry.parent = this;
        return this;
    }
    protected void printList(String prefix) {
        System.out.println(prefix + "/" + this);
        Iterator iterator = directory.iterator();
        while (iterator.hasNext()) {
            Entry entry = (Entry) iterator.next();
            entry.printList(prefix + "/" + name);
        }
    }
}
// 客户端
public class Main {
    public static void main(String[] args) {
        try {
            System.out.println("Making root entries...");
            Directory rootdir = new Directory("root");
            Directory bindir = new Directory("bin");
            Directory tmpdir = new Directory("tmp");
            Directory usrdir = new Directory("usr");
            rootdir.add(bindir);
            rootdir.add(tmpdir);
            rootdir.add(usrdir);
            bindir.add(new File("vi", 10000));
            bindir.add(new File("latex", 20000));
            rootdir.printList();

            System.out.println();
            System.out.println("Making user entries...");
            Directory yuki = new Directory("yuki");
            Directory hanako = new Directory("hanako");
            Directory tomura = new Directory("tomura");
            usrdir.add(yuki);
            usrdir.add(hanako);
            usrdir.add(tomura);
            yuki.add(new File("diary.html", 100));
            yuki.add(new File("composite.java", 200));
            hanako.add(new File("memo.tex", 300));
            tomura.add(new File("game.doc", 400));
            File entry = new File("junk.mail", 500);
            tomura.add(entry);

            rootdir.printList();
            System.out.println("entry.getFullPath(): " + entry.getFullPath());
        } catch (FileTreatmentException e) {
            e.printStackTrace();
        }
    }
}
参考书籍:图解设计模式(ISBN国际标准书号: 9787115439499)
修饰模式 (装饰模式)
向某个对象动态地添加更多的功能。修饰模式是除类继承外另一种扩展功能的方法。
// The Window interface class
public interface Window {
    void draw(); // Draws the Window
    String getDescription(); // Returns a description of the Window
}

// implementation of a simple Window without any scrollbars
public class SimpleWindow implements Window {
	public void draw() {
		// Draw window
	}
	public String getDescription() {
		return "simple window";
	}
}

// 以下类包含所有Window类的decorator,以及修饰类本身。
// abstract decorator class - note that it implements Window
public abstract class WindowDecorator implements Window {
    protected Window decoratedWindow; // the Window being decorated
    public WindowDecorator (Window decoratedWindow) {
        this.decoratedWindow = decoratedWindow;
    }
    @Override
    public void draw() {
        decoratedWindow.draw();
    }
    @Override
    public String getDescription() {
        return decoratedWindow.getDescription();
    }
}

// The first concrete decorator which adds vertical scrollbar functionality
public class VerticalScrollBar extends WindowDecorator {
	public VerticalScrollBar(Window windowToBeDecorated) {
		super(windowToBeDecorated);
	}
	@Override
	public void draw() {
		super.draw();
		drawVerticalScrollBar();
	}
	private void drawVerticalScrollBar() {
		// Draw the vertical scrollbar
	}
	@Override
	public String getDescription() {
		return super.getDescription() + ", including vertical scrollbars";
	}
}

// The second concrete decorator which adds horizontal scrollbar functionality
public class HorizontalScrollBar extends WindowDecorator1 {
	public HorizontalScrollBar (Window windowToBeDecorated) {
		super(windowToBeDecorated);
	}
	@Override
	public void draw() {
		super.draw();
		drawHorizontalScrollBar();
	}
	private void drawHorizontalScrollBar() {
		// Draw the horizontal scrollbar
	}
	@Override
	public String getDescription() {
		return super.getDescription() + ", including horizontal scrollbars";
	}
}
// 以下是一个测试程序,它创建了一个包含多重装饰的Window实例(如,包含了垂直的和水平的滚动条),然后输出它的描述:
public class Main {
	// for print descriptions of the window subclasses
	static void printInfo(Window w) {
		System.out.println("description:"+w.getDescription());
	}
	public static void main(String[] args) {
		// original SimpleWindow
		SimpleWindow sw = new SimpleWindow();
		printInfo(sw);
		// HorizontalScrollBar  mixed Window
		HorizontalScrollBar hbw = new HorizontalScrollBar(sw);
		printInfo(hbw);
		// VerticalScrollBar mixed Window
		VerticalScrollBar vbw = new VerticalScrollBar(hbw);
		printInfo(vbw);
	}
}
// 以下是SimpleWindow及添加了组件HorizontalScrollBar和VerticalScrollBar后的Window测试结果:
description:simple window
description:simple window, including horizontal scrollbars
description:simple window, including horizontal scrollbars, including vertical scrollbars
外观模式 (门面模式)
为子系统中的一组接口提供一个一致的界面, 外观模式定义了一个高层接口,这个接口使得这一子系统更加容易使用。
// 这是一个抽象的示例。一个客户“you”通过外观接口“computer”启动计算机。

/* Complex parts */
class CPU {
	public void freeze() {
	    // ...
	}
	public void jump(long position) {
	    // ...
	}
	public void execute() {
	    // ...
	}
}
class Memory {
	public void load(long position, byte[] data) {
		// ...
	}
}
class HardDrive {
	public byte[] read(long lba, int size) {
		// ...
	}
}

/* Façade */
class Computer {
	public void startComputer() {
		cpu.freeze();
		// 内存启动位置,硬盘扇区与扇区大小
		memory.load(BOOT_ADDRESS, hardDrive.read(BOOT_SECTOR, SECTOR_SIZE));
		// cpu启动位置
		cpu.jump(BOOT_ADDRESS);
		cpu.execute();
	}
}

/* Client */
class You {
	public static void main(String[] args) {
		Computer facade = new Computer();
		facade.startComputer();
	}
}
享元模式
通过共享以便有效的支持大量小颗粒对象。
// 享元模式利用只加载执行任务时所必需的最少资料,因而减少内存使用量。
public enum FontEffect {
    BOLD, ITALIC, SUPERSCRIPT, SUBSCRIPT, STRIKETHROUGH
}

public final class FontData {
    // A weak hash map will drop unused references to FontData.
    // Values have to be wrapped in WeakReferences,
    // because value objects in weak hash map are held by strong references.
    private static final WeakHashMap<FontData, WeakReference<FontData>> FLY_WEIGHT_DATA =
        new WeakHashMap<FontData, WeakReference<FontData>>();
    private final int pointSize;
    private final String fontFace;
    private final Color color;
    private final Set<FontEffect> effects;

    private FontData(int pointSize, String fontFace, Color color, EnumSet<FontEffect> effects) {
        this.pointSize = pointSize;
        this.fontFace = fontFace;
        this.color = color;
        this.effects = Collections.unmodifiableSet(effects);
    }

    public static FontData create(int pointSize, String fontFace, Color color,
        FontEffect... effects) {
        EnumSet<FontEffect> effectsSet = EnumSet.noneOf(FontEffect.class);
        for (FontEffect fontEffect : effects) {
            effectsSet.add(fontEffect);
        }
        // We are unconcerned with object creation cost, we are reducing overall memory consumption
        // 我们不关心对象创建成本,我们在减少整体内存消耗
        FontData data = new FontData(pointSize, fontFace, color, effectsSet);

        // Retrieve previously created instance with the given values if it (still) exists
        // 如果给定的值仍然存在的话,恢复先前创建的实例
        WeakReference<FontData> ref = FLY_WEIGHT_DATA.get(data);
        FontData result = (ref != null) ? ref.get() : null;

        // Store new font data instance if no matching instance exists
        // 如果没有匹配的实例存在的话,存储新的字体数据实例
        if (result == null) {
            FLY_WEIGHT_DATA.put(data, new WeakReference<FontData> (data));
            result = data;
        }
        // return the single immutable copy with the given values
        return result;
    }

    @Override
    public boolean equals(Object obj) {
        if (obj instanceof FontData) {
            if (obj == this) {
                return true;
            }
            FontData other = (FontData) obj;
            return other.pointSize == pointSize && other.fontFace.equals(fontFace)
                && other.color.equals(color) && other.effects.equals(effects);
        }
        return false;
    }

    @Override
    public int hashCode() {
        return (pointSize * 37 + effects.hashCode() * 13) * fontFace.hashCode();
    }

    // Getters for the font data, but no setters. FontData is immutable.
}
代理模式
为其他对象提供一个代理以控制对这个对象的访问。
// ProxyImage 类别用来访问远程方法。
interface Image {
    void displayImage();
}

//on System A
class RealImage implements Image {
    private String filename;
    public RealImage(String filename) {
        this.filename = filename;
        loadImageFromDisk();
    }
    private void loadImageFromDisk() {
        System.out.println("Loading   " + filename);
    }
    public void displayImage() {
        System.out.println("Displaying " + filename);
    }
}

//on System B
class ProxyImage implements Image {
    private String filename;
    private Image image;
    public ProxyImage(String filename) {
        this.filename = filename;
    }
    public void displayImage() {
        if(image == null)
              image = new RealImage(filename);
        image.displayImage();
    }
}

class ProxyExample {
    public static void main(String[] args) {
        Image image1 = new ProxyImage("HiRes_10MB_Photo1");
        Image image2 = new ProxyImage("HiRes_10MB_Photo2");

        image1.displayImage(); // loading necessary
        image2.displayImage(); // loading necessary
    }
}
程序的输出为:
Loading    HiRes_10MB_Photo1
Displaying HiRes_10MB_Photo1
Loading    HiRes_10MB_Photo2
Displaying HiRes_10MB_Photo2
行为型模式
责任链模式
为解除请求的发送者和接收者之间耦合,而使多个对象都有机会处理这个请求。 将这些对象连成一条链,并沿着这条链传递该请求,直到有一个对象处理它。
// 以下的日志类(logging)例子演示了该模式。
// 注意:该例子不是日志类的推荐实现方式。
// 每一个logging handler首先决定是否需要在该层做处理,然后将控制传递到下一个logging handler。
// 通常在责任链模式的实现中,如果在某一层已经处理了这个logger,那么这个logger就不会传递下去。
// 在我们这个例子中,消息会一直传递到最底层不管它是否已经被处理。

import java.util.*;

abstract class Logger
{
    public static int ERR = 3;
    public static int NOTICE = 5;
    public static int DEBUG = 7;
    protected int mask;
    // The next element in the chain of responsibility
    protected Logger next;
    public Logger setNext( Logger l){
        next = l;
        return this;
    }
    public final void message( String msg, int priority ){
        if ( priority <= mask ) {
            writeMessage( msg );
            if ( next != null ) {
                next.message( msg, priority );
            }
        }
    }
    protected abstract void writeMessage( String msg );
}

class StdoutLogger extends Logger {
    public StdoutLogger( int mask ) { this.mask = mask; }
    protected void writeMessage( String msg ){
        System.out.println( "Writting to stdout: " + msg );
    }
}

class EmailLogger extends Logger {
    public EmailLogger( int mask ) { this.mask = mask; }
    protected void writeMessage( String msg ){
        System.out.println( "Sending via email: " + msg );
    }
}

class StderrLogger extends Logger {
    public StderrLogger( int mask ) { this.mask = mask; }
    protected void writeMessage( String msg ){
        System.out.println( "Sending to stderr: " + msg );
    }
}

public class ChainOfResponsibilityExample{
    public static void main( String[] args )
    {
        // Build the chain of responsibility
        Logger l = new StdoutLogger( Logger.DEBUG).setNext(
                            new EmailLogger( Logger.NOTICE ).setNext(
                            new StderrLogger( Logger.ERR ) ) );
        // Handled by StdoutLogger
        l.message( "Entering function y.", Logger.DEBUG );
        // Handled by StdoutLogger and EmailLogger
        l.message( "Step1 completed.", Logger.NOTICE );
        // Handled by all three loggers
        l.message( "An error has occurred.", Logger.ERR );
    }
}
程序的输出是:
  Writing to debug output: Entering function y.
  Writing to debug output: Step1 completed.
  Sending via e-mail:      Step1 completed.
  Writing to debug output: An error has occurred.
  Sending via e-mail:      An error has occurred.
  Writing to stderr:       An error has occurred.
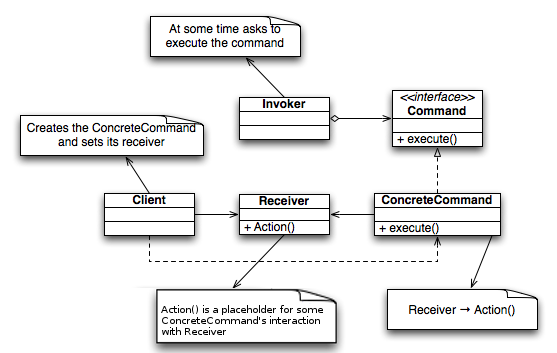
命令模式
将一个请求封装为一个对象,从而使你可用不同的请求对客户进行参数化;对请求排队或者记录请求日志,以及支持可取消的操作。
图片来源:wiki
import java.util.List;
import java.util.ArrayList;

/* The Command interface */
public interface Command {
   void execute();
}

/* The Invoker class */
public class Switch {
   private List<Command> history = new ArrayList<Command>();
   public Switch() { }
   public void storeAndExecute(Command cmd) {
      this.history.add(cmd); // optional
      cmd.execute();
   }
}

/* The Receiver class */
public class Light {
   public Light() { }
   public void turnOn() { System.out.println("The light is on"); }
   public void turnOff() { System.out.println("The light is off"); }
}

/* The Command for turning on the light - ConcreteCommand #1 */
public class FlipUpCommand implements Command {
   private Light theLight;
   public FlipUpCommand(Light light) { this.theLight = light; }
   public void execute(){ theLight.turnOn(); }
}

/* The Command for turning off the light - ConcreteCommand #2 */
public class FlipDownCommand implements Command {
   private Light theLight;
   public FlipDownCommand(Light light) { this.theLight = light; }
   public void execute() { theLight.turnOff(); }
}

/* The test class or client */
public class PressSwitch {
   public static void main(String[] args){
      Light lamp = new Light();
      Command switchUp = new FlipUpCommand(lamp);
      Command switchDown = new FlipDownCommand(lamp);

      Switch mySwitch = new Switch();
      try {
         if ("ON".equalsIgnoreCase(args[0])) {
            mySwitch.storeAndExecute(switchUp);
         } else if ("OFF".equalsIgnoreCase(args[0])) {
            mySwitch.storeAndExecute(switchDown);
         } else {
            System.out.println("Argument \"ON\" or \"OFF\" is required.");
         }
      } catch (Exception e) {
         System.out.println("Arguments required.");
      }
   }
}
解释器模式
给定一个语言, 定义它的文法的一种表示,并定义一个解释器, 该解释器使用该表示来解释语言中的句子。
迭代器模式
提供一种方法顺序访问一个聚合对象中各个元素, 而又不需暴露该对象的内部表示。
中介者模式
包装了一系列对象相互作用的方式,使得这些对象不必相互明显作用,从而使它们可以松散偶合。 当某些对象之间的作用发生改变时,不会立即影响其他的一些对象之间的作用,保证这些作用可以彼此独立的变化。
备忘录模式
备忘录对象是一个用来存储另外一个对象内部状态的快照的对象。备忘录模式的用意是在不破坏封装的条件下, 将一个对象的状态捉住,并外部化,存储起来,从而可以在将来合适的时候把这个对象还原到存储起来的状态。
观察者模式
在对象间定义一个一对多的联系性,由此当一个对象改变了状态,所有其他相关的对象会被通知并且自动刷新。
状态模式
让一个对象在其内部状态改变的时候,其行为也随之改变。状态模式需要对每一个系统可能获取的状态创立一个状态类的子类。 当系统的状态变化时,系统便改变所选的子类。
策略模式
定义一个算法的系列,将其各个分装,并且使他们有交互性。策略模式使得算法在用户使用的时候能独立的改变。
模板方法模式
模板方法模式准备一个抽象类,将部分逻辑以具体方法及具体构造子类的形式实现, 然后声明一些抽象方法来迫使子类实现剩余的逻辑。 不同的子类可以以不同的方式实现这些抽象方法,从而对剩余的逻辑有不同的实现。 先构建一个顶级逻辑框架,而将逻辑的细节留给具体的子类去实现。
访问者模式
封装一些施加于某种数据结构元素之上的操作。一旦这些操作需要修改,接受这个操作的数据结构可以保持不变。 访问者模式适用于数据结构相对未定的系统,它把数据结构和作用于结构上的操作之间的耦合解脱开, 使得操作集合可以相对自由的演化。
常见问题
抽象工厂模式与工厂方法模式的区别
抽象工厂模式创建的是产品族,而工厂方法模式创建的是产品。
抽象工厂模式与建造者模式的区别
建造者模式着重于一步步构造一个复杂对象,而抽象工厂模式着重于多个系列的产品对象(简单的或是复杂的)。
建造者模式在最后的一步返回产品,而对于抽象工厂来说,产品是立即返回的。